
The upper body practice of the intermediate-level Plow pose yoga works on our Throat (Vishudhi Chakra) and Solar Plexus (Manipura). The former takes responsibility for the choice, willpower, self-expression, and communication, while the latter can affect our digestive fire, strength, balance, and self-esteem.
This Hatha yoga initiated posture can highly affect our metabolic rate, tone our spinal nerves, and improve our flexibility and digestion. Let’s discover this beneficial position in-depth in the following content!
What Is Plow Pose Yoga?
This posture is usually practiced when the yoga class is about to end because it helps practitioners get ready for the meditation and Savasana (Corpse Pose).
It does that by rejuvenating our nervous system and stretching our spine, calming and relaxing our heart, brain, and nerves.
Definition
First, let’s discuss the name of it word-by-word. The Plow pose Sanskrit goes as Halasana, which originates from two main components:
- Hala: Plow
- Asana: Pose
As you can see from the word “Hala”, this posture’s name is the Indian plough (plow) that they use to cultivate their land. It’s similar to how the posture helps revitalize and soothe the landscape in our spirit, body, and mind so that we are ready for deep renewal and contemplation.
People often use this pose before bedtime or before doing the Corpse Pose, pranayama, or meditation.
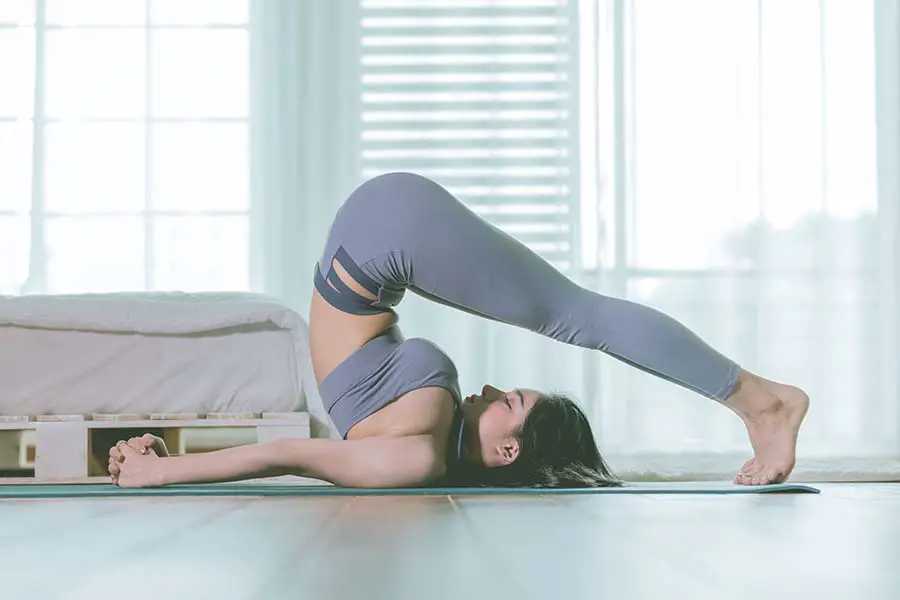
In this stretch, when our bodies are turned upside down, we get to see things from a new perspective. All parts of our body will join hands in performing it in a new way that they don’t normally do. For example, you will see your feet over the head, your hips stand higher than everything else, and you have to look up to see your knees.
Doing this pose requires us to have our minds and thoughts working at their best due to the change of focus. We will stay in the restful position where we recline to begin the position. Then we need to focus our strength and flexibility, lift our bodies, and be so careful not to damage our neck.
Benefits
The health benefits of Halasana are endless. It betters your health not only physically but also mentally.
Doing the pose helps you open and stretch your back, shoulders, and neck. That stretching carries great welfare, such as lengthening your spine, stretching your shoulders, and relieving backache. Also, it will tone your digestive organs by impacting your abdomen and then improve your body’s detoxification.
More importantly, the posture regulates and stimulates your thyroid gland, regulates your breath, and relieves excess mucus and phlegm in your respiratory and sinuses system. It will gradually lengthen your breath through time. If you carry out the pose properly, your throat and neck tension will be released. But be careful of neck injury or strain!
Mentally, it assists you in restoring and calming your sympathetic nervous system, relieving fatigue and stress while improving your concentration and memory. This affection will do good deeds to those with a big workload.
The pose is often used to treat people with sinusitis, insomnia, headaches, and backaches.
Cautions
Though it comes with great health perks, there are circumstances where you must be extra careful before doing the plow stretch:
- People with diarrhea issues must stay away from this practice.
- Glaucoma or eye-related problems and serious neck or back injury are also some health problems that practitioners shouldn’t have if they want to do this.
- Always consult your coach before doing any inversions if you’re on your period.
- For pregnant women, if you’re already used to doing Halasana, and it’s there in your regular practice session, you can do the pose. But in case you want to try it as a new posture, then wait for a minimum of 8 weeks after you’ve given birth for better health protection.
- People suffering from high blood pressure or asthma shouldn’t practice the whole position but a specific version. They will have their legs supported when their feet can’t come to the ground.
- The pose is not something to joke about. Only practice it with your experienced instructor. Moreover, only advanced or intermediate students with regular practice schedules should do it. Do not rush! Take time to perfect and get your body used to the workout!
- Consult your doctor if there are any concerns about your medical conditions. Don’t push yourself out of your abilities and limits.
How To Do Plow Pose?
Now that you’ve prepared yourself for the journey let us begin!
Instructions
- Prepare your blankets by stacking 3 blankets properly, so their edges sit perfectly on top of each other. Let it sit near your mat’s front, so its edges and the mat sides line up near its middle.
- Sit at your mat’s front end and place your back on top of the stack to support the torso. Your shoulders’ tops should be over that edge about one inch, while your head’s back should rest directly on the floor.
- When lying, your face will face up the ceiling with your neck’s front sitting long and leaving space between it and the floor.
- Pull the knees toward the chest. Next, straighten and bring the legs up to the ceiling.
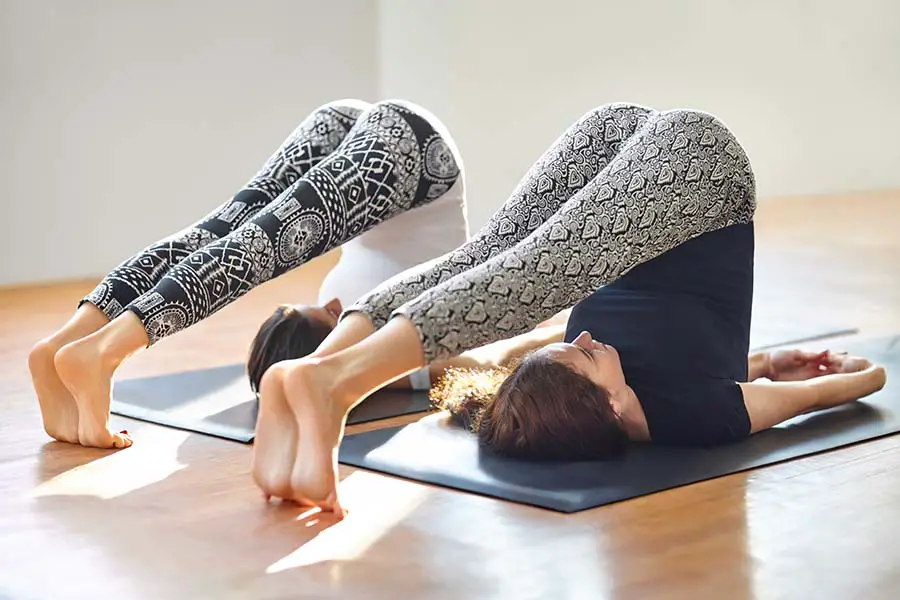
- Now, gather your abs’ strength, use both hands to support yourself at your mid or low back, and lift the hips on the floor. Then, roll yourself up until your shoulders are supporting your whole body. Place the hips higher than the shoulders.
- Gently lower the legs to the back over the top of your head until you find the toes approaching the ground on your back. Keep your feet flexed while relaxing your toes there.
- Place the arms on the floor with the palms facing down or clasping. Use the outer upper of your arms and your shoulders to press down and create a better lift with the spine.
- Keep that position for at least five breaths.
- When you’re done, stop clasping your hands, rest the hands and arms on your mat, then gently and slightly roll down on your vertebra.
- Spend some moments for your back to settle into the normal curves.
How To Teach
If you’re a coach finding advice to teach your students, here are some cues:
- The small space sitting between the floor and the neck’s back is to protect your cervical spine. So, don’t rest your neck’s back directly on the floor.
- Squeezing the shoulder blades toward each other will assist you in lifting yourself. However, open your sternum with the blades broadened across your back when you’re already in this position.
- You might overstretch the neck if you try too much and pull the shoulders too far from the ears. Though you must let your shoulders’ tops push down your blankers, you should lift them slightly to your ears so that your throat and neck’s back are soft.
Conclusion
People often take the Plow pose yoga as difficult life circumstances. The secret to the best result is the way we face them: will we take the opportunity to grow or let it destroy us?
Plowing will help our earth, equivalent to our body and mind being fertile so that sowing can happen best. In other words, constantly challenging our minds and bodies will help us grow better.

0 Comments