
Wheel pose yoga (urdhva dhanurasana) is always ranked as difficult to do, requiring the yogists to take more time. When practicing it, you need to bend the body at the highest level so that it will stop when the hand touches the ground.
To perform it correctly, you need to know the steps and experience to practice effectively. In the following article, we will share a detailed guide and tips to do this stance.
What is Yoga Wheel Pose?
This yoga posture gives flexibility and tones the body using stamina and determination to perform the movement. It requires maximum effort from the whole body and mind to resist gravity to keep the body flexible.
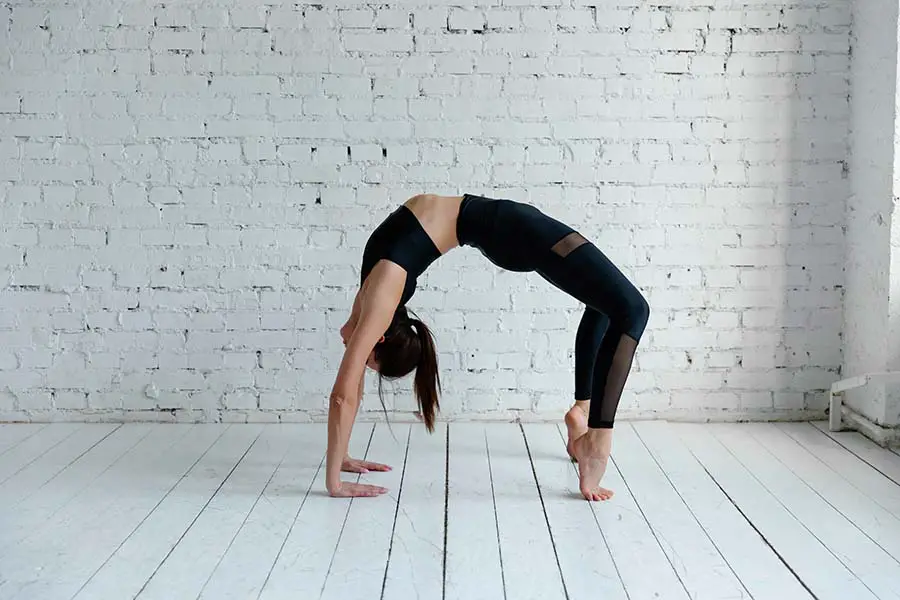
When performing the stance, the main force acting on the pose is in the arms, shoulders, chest, lower back, legs, feet, and neck. At the same time, you need to combine with the slow breathing process to regulate blood circulation in the body.
There is no denying that this posture requires high endurance of the waist and back. So before you start challenging your body with the wheel pose, try following the sequence of back stretches to make the exercise more effective and easier.
How To Do Wheel Pose Yoga Effectively
Step 1:
The first step in doing a wheel stance is to stop moving. It will be necessary to rotate the wrist, ankle, and hip joints to ensure flexibility during exercise.
Step 2:
After the warm-up, lie on your back on the floor, bend your knees, and place your feet hip-width apart, just the right distance from your hips. Next, place your hands on the mat, fingers pointing toward your shoulders, elbows up.
Step 3:
Press your shoulders into the floor until you feel your shoulders open and slightly raise your chest. Press the inner foot down to keep the knees from swinging to the sides and activate the glutes.
Step 4:
Now, inhale deeply and press into your hands to lift your body in the next step. You can lift on top of your head first, and you need to straighten your arms as much as possible. As you inhale, raise your hips to the ceiling, holding for a breath or two.
Step 5:
Finally, you try to hold the pose for 5-10 breaths. To get rid of wheel position yoga, you need to exhale and look up at the ceiling as you lower your body to the floor, chin toward your chest. Do not drop directly on top of your head to avoid injury to your neck and head vertebrae.
Note: If you are still not confident performing the recline on your own, use a support device to support your back, such as a yoga ball, or directly seek an instructor for assistance to ensure safety during practice.
What Are The Benefits Of Wheel Pose Yoga?
One of the main wheel pose benefits is opening up the lungs, chest, and shoulders. It strengthens the legs, abs, glutes, spine, shoulders, wrists, and arms. Besides, it helps your hips and wrists become more flexible, increasing central muscle strength.
This stance also stimulates the pituitary gland, reducing back pain. Stretching the back muscles is an extremely effective method of reducing pain and stiffness in the spine.
Inverted yoga postures have always been known for their beneficial effects on the cardiovascular, lymphatic, nervous, and endocrine systems. Like most other yoga stances, the wheel pose also aids in balancing our mind, body, and emotions. Shaping your body in a posture will move you towards joy and courage in life. This way, you can eliminate stress and depression to be more energetic.
Overall, completing the wheel yoga pose will leave you feeling fulfilled and positive.
Precautions And Safety
It’s best to avoid this pose if you have tendonitis in your wrist or carpal tunnel syndrome. If you feel your back hurts, stop immediately. Do not take this stance when you have shoulder pain, headaches, or high blood pressure.
When you’re new to the full wheel yoga pose, you may find it difficult to lift your body off the floor. Or your feet and knees are sliding apart, and your lower back is compressed. You can equip a strap on your thighs to keep your legs hip-width apart. This way will make it easier for you.
Or you can also use the support of a yoga block between the big toes to keep the foot from being misplaced. Once you’ve mastered it, you can level up the difficulty by doing the one-legged wheel pose.
To perform, from wheel position, you slowly move your body weight to 1 leg, then exhale, bend one leg and point towards the ceiling. Hold it for a few seconds and slowly repeat with the opposite leg.
Conclusion
In short, the above is a complete set of information to perform the wheel pose yoga safely and effectively. If you are a beginner, slowly continue practicing and doing warm-up steps.
So, it will bring the desired results. Hopefully, you can experience a feeling of relaxation, balance, and total body tension throughout your training journey.


0 Comments